Showing posts with label dessert. Show all posts

6.26.2012

The Perfect 4th of July Dessert: A Flag Cake!

Happy (almost) 4th of July! Not only is it time to celebrate our country's birthday, if you live in Los Angeles it's also time to celebrate the end of June gloom and the beginning of perfect summer weather. This weekend, that means a plethora of BBQs, picnics and pool parties. For guests of those BBQs and pool parties, it also means figuring out what to bring! If you're at a loss over what [insert dish here] to make as your BBQ contribution, worry no more! I've got an absolutely fantastic dessert that will put your patriotism – and baking skills – on full display.

The perfect 4th of July party dessert!
It's a flag cake. Yes, a flag cake. All you need to do is make a cake, make some icing and garnish with blueberries and raspberries until it looks like the American flag. Okay, maybe it's not really that simple – it's a bit time-consuming and some basic piping skills are required – but it's SO worth it, especially for this red, white and blue holiday. While I made the cake and the frosting from scratch, you can absolutely use boxed cake mix and tubs of buttercream or cream cheese icing. The recipe I'm following is from the Barefoot Contessa herself: Ina Garten. It can be found in her Barefoot Contessa Family Style cookbook and it's my #1 go-to Fourth of July dessert recipe. Hopefully it will be yours, too!

Ingredients
For the cake:
  • 18 tablespoons (2 1/4 sticks) unsalted butter at room temperature
  • 3 cups sugar
  • 6 extra-large eggs at room temperature
  • 1 cup sour cream at room temperature
  • 1 1/2 teaspoons pure vanilla extract
  • 3 cups flour
  • 1/3 cup cornstarch
  • 1 teaspoon kosher salt
  • 1 teaspoon baking soda
For the icing:
  • 1 pound (4 sticks) unsalted butter at room temperature
  • 1 1/2 pounds cream cheese at room temperature
  • 1 pound confectioners' sugar, sifted
  • 1 1/2 teaspoons pure vanilla extract
For the "flag" decorations:
  • 2 half-pints blueberries
  • 3 half-pints raspberries
To make the cake: Heat the oven to 350 degrees F. Butter and flour an 18 x 13 x 1 1/2-inch sheet pan. Cream the butter and sugar in the bowl of an electric mixer fitted with the paddle attachment on high speed, until light and fluffy. On medium speed, add the eggs, 2 at a time, then add the sour cream and vanilla. Scrape down the sides and stir until smooth.

Butter and flour an 18 x 13 x 1 1/2-inch sheet pan

Cream butter and sugar


Add eggs, one at a time
Add vanilla and sour cream and mix to combine
This is what the wet ingredient batter should look like
Sift together the flour, cornstarch, salt, and baking soda in a bowl. With the mixer on low speed, add the flour mixture to the butter mixture until just combined. Pour into the prepared pan. Smooth the top with a spatula. Bake in the center of the oven for 20 to 30 minutes, until a toothpick comes out clean. Cool to room temperature.

Sift together flour, cornstarch, salt, and baking soda
With mixer on low, add dry ingredients slowly to wet ingredients. The batter should look like this when all the dry ingredients are incorporated.
Spread the batter evenly on the baking sheet

Bake for 25-30 minutes or until a toothpick comes out clean.
Make the icing: Combine the butter, cream cheese, sugar, and vanilla in the bowl of an electric mixer fitted with the paddle attachment, mixing just until smooth.

Combine icing ingredients and mix until smooth

Decorate the cake: I keep the cake in the baking sheet and serve it that way. It's much easier for me. If you want to flip the cake out, line the baking sheet with parchment paper and flip it onto a large platter after it has baked and cooled. Then spread three-fourths of the icing on the top of the cooled sheet cake. Outline the flag on the top of the cake with a toothpick. Fill the upper left corner with blueberries. Place 2 rows of raspberries across the top of the cake like a red stripe. Put the remaining icing in a pastry bag fitted with a star tip and pipe two rows of white stripes below the raspberries. Alternate rows of raspberries and icing until the flag is completed. Pipe stars on top of the blueberries.

Spread 3/4 of icing onto cake. Outline flag with a toothpick.
Wash and dry blueberries
Line rows of blueberries for the "star" area of the flag.
Fill the entire "star" area with blueberries.
VERY GENTLY, clean and dry the raspberries.
Starting at top of cake, make two rows of raspberries.
Using a large star tip in a piping bag, pipe two rows of icing below raspberries.
Alternate rows of raspberries and icing until flag is complete (you can already see the flag taking shape!).

Here's the detail of the raspberry and icing rows.
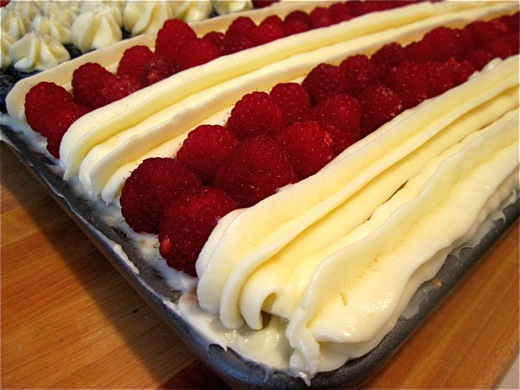
Pipe stars onto the blueberry layer.

You're done! You've got a 4th of July flag cake! Chill it in the fridge for a bit before taking it to your party.


4.07.2011

Popcakes: You Can't Beat Cake on a Stick!

Think about the last time you went to a baby shower, a bridal shower, a wedding, or even a birthday party. What do you remember most from the event? Fun conversation? The food? The open bar (at which someone had one too many vodka sodas and acted the fool)? As memorable as the token drunk guest may be, when I think about recent events I've attended, I remember the tiny details, the personalized touches that really boost a good event into a great one. For example, we recently attended a wedding in Zihuatanejo, Mexico and each guestroom had a welcome bag complete with personalized embroidered towels and the favorite snacks of each guest. At our wedding, Bryan and I designed a custom Napa Valley map and welcome letter that included a list of our favorite wineries, restaurants and off-the-beaten-path attractions. Another close friend's wedding had a nacho bar open to guests before the reception, an homage to the bride's love for all-things-chips-and-cheese.

Popcakes!
Photo credit: PopCakes

So when I recently co-hosted a bridal shower for a close friend, I wanted to include a fun touch that both honored the bride and groom and gave the guests something to take home. Turns out they were something to talk about, too. I turned to friends at Popcakes, a company that I found at Savor Los Angeles, an annual premiere dessert event. What exactly is a popcake? Simply put, it's a small ball of cake on a stick, dipped in icing and covered with anything from crystal sprinkles, jimmies to incredibly intricate fondant and frosting designs. Think college mascots, baby blocks, soccer balls, etc.

Custom Popcakes
I asked Popcakes to create a series of popcakes that reflected the bride's wedding colors: purple, green and white. I chose three flavors of cake filling: red velvet, chocolate and a marble swirl. Then, as a fun touch, Popcakes attached a small fondant heart disk piped with the initials of the bride and groom to each popcake. The popcakes were then wrapped in cellophane bags, tied with purple, green and white ribbon, and shipped to me. At the shower, I simply arranged them in glasses using the shredded paper from the packaging as a base. They were a small touch, but one that guests really enjoyed, especially when they found themselves eating red velvet cake on a stick. In general, I've always thought food on a stick is way more fun than food on a plate; it makes for fun conversation and even an ice breaker as people try to keep the food on the stick or in their mouths (and not on the floor). Popcakes are no exception, and I'll definitely order from them again.


Popcakes
Phone: 949.207.6030


10.31.2010

Gourmet Magazine's Pumpkin Gingersnap Parfait

Finally, I get to make this gingersnap pumpkin parfait. I've had this recipe in the blog hopper, so to speak, since fall of last year. Why so long? There was never the "right" time to make it, because by the time I thought about it, fall was long gone. And no one wants to make a pumpkin recipe in April. This recipe, courtesy of Gourmet Magazine, is great. The hardest part of the recipe requires you to "bloom" gelatin over warm water for a minute. If you can handle that -- which I know you can -- then you're good to go.

Pumpkin Gingersnap Parfait
From start to finish the parfaits took me about one hour to make, which doesn't take into account time spent wondering if I just should just eat the whipped pumpkin creme directly out of the bowl (I did not). If you're in a time crunch, you can make the parfaits one day ahead of time and let them just chill out in the fridge. I also recommend using either Ziploc-turned-piping bags or professional pastry piping bags to layer the pumpkin mixture and whipped cream. That way you end up with the clean layers inside the glass, rather than all over the sides. Here's how you make them:

Ingredients:
  • 1 envelope unflavored gelatin (2 1/4 tsp)
  • 1/4 cup cold water
  • 1 (15-oz) can pure pumpkin
  • 1/2 cup packed light brown sugar
  • 1/2 teaspoon cinnamon
  • 1/2 teaspoon nutmeg
  • 1/4 teaspoon ground ginger
  • 1/8 teaspoon salt
  • 2 1/4 cups chilled heavy cream, divided
  • 1 1/2 teaspoons pure vanilla extract, divided
  • 20 gingersnap cookies, coarsely crushed
  • EQUIPMENT: 8 (6- to 8-oz) glasses
Directions: Sprinkle gelatin over water in a small saucepan and let soften 1 minute. Bring to a bare simmer, stirring until gelatin has dissolved. Whisk together gelatin mixture, pumpkin, brown sugar, spices, and salt in a large bowl. Beat 1 cup cream with 1/2 tsp vanilla until it holds soft peaks, then fold into pumpkin mixture gently but thoroughly. Beat remaining 1 1/4 cups cream with remaining 1 tsp vanilla until it holds soft peaks. Spoon about 1/4 cup pumpkin mixture into bottom of each glass, then sprinkle with some of cookies and top with about 2 Tbsp whipped cream. Repeat layers once, ending with cream. Chill until set, at least 2 hours. Note: Parfaits can be made up to one day in advance and chilled.

Pumpkin Parfaits: Step By Step

Need some more guidance? Here are step-by-step photos. Hopefully they're helpful!

Step #1: Pipe a layer of pumpkin mixture into bottom of each glass

Step #2: Sprinkle crushed gingersnap cookies over pumpkin mixture

Step #3: Layer whipped cream

Step #4: Pipe another layer of pumpkin mixture

Step #5: Sprinkle another layer of crushed gingersnap cookies

Step #6: Pipe another layer of whipped cream

Step #7: Sprinkle a few more crumbles of gingersnap cookies

You're all done! Stick the parfaits in the refrigerator for a few hours and serve up to one day later. If you can wait that long!

Pumpkin Parfait: Just Chill & Enjoy


10.07.2010

Earning My Stripes: Argyle Sugar Cookies

I think I've got a problem. For the third or fourth time, I've taken on a substantial dessert project for a friend. A project that takes me a good solid week to accomplish. But that's NOT the problem; the "problem" is that I really, really love it and wish I could do it all the time. I realized I get a sick amount of satisfaction and joy from sitting at my dining room table (my kitchen is just way too small) and rolling out dough, shaping cookies, setting up cooling racks and then -- for HOURS -- piping layers of elaborate decorations on cookie after cookie after cookie. I can spend as much time happily doing that as my husband can watching football for days at a time. It's kind of sick, but I guess we've all got our thing.

My latest "project"...

...Argyle sugar cookies with a fondant initial for a friend's baby shower
So what was the project this time? Custom-designed sugar cookies for a circus-themed baby shower. Specifically, I made 30 rectangular sugar cookies piped with a dual blue argyle pattern to match the baby shower invitation. Oh, and I also created 30 white fondant "E's" (the baby's name is Ethan), brushed them with luster dust (basically sparkle powder you mix with vodka and paint on the fondant), piped a white border and added white sanding sugar to each. Yeah, so that also goes on each cookie. Like I said, I think I have a problem...

Fondant "E's" - The baby's name is Ethan
If you have a "problem" similar to mine -- basically, an insane love for baking and arts & crafts -- here are the cookie and icing recipes plus step-by-step instructions and photos. Note that I've left out photos of mixing, rolling and cutting out the dough and have gone straight to the decorations. If you'd like to see the dough prep photos, check out my earlier sugar cookie project post here. Enjoy!

Sugar Cookies
  • 25 ounces (3 cups, 1 ounce) pastry flour or all-purpose flour
  • 11 ounces (1 cup, 3 ounces) sugar
  • ½ teaspoon salt
  • 1 pound (equivalent of four sticks) butter, chilled and cut into cubes
  • 1 tablespoon + 1 teaspoon vanilla (I prefer Madagascar vanilla paste)
  • 2 ounces cream cheese, room temperature
Royal Icing
Yields approximately 2 1/2 cups
  • 16 ounces powdered sugar, sifted at least once
  • 2-3 large egg whites (I used pasteurized egg whites in a carton, which is safer for pregnant women and children)
  • 1/4 teaspoon cream of tartar
To make the sugar cookies: Add all dry ingredients into a standing mixer with a paddle attachment. Mix on LOW until combined. If you put it on a higher setting, you'll end up wearing the dry ingredients. With mixer running on low, add in the cold butter pieces a few at a time until a crumbly, wet dough starts to form. You may to increase to speed as the dough thickens. Make sure you do not let it come together into a ball of dough, as you still have to add the cream cheese and vanilla paste. With the mixer still running, add the vanilla paste and cream cheese and mix on low until dough forms large clumps. Turn the dough out onto a clean surface and knead lightly to finish. Break the dough into four equal portions and rap in plastic (13-14 oz. each). Chill for at least an hour, then roll out until the dough is 3/8”-1/4” thick. Cut or shape as desired. Re-roll scraps only once. Freeze shapes before baking and do NOT thaw before putting them in the oven. When ready to bake, preheat oven to 325 degrees. Line a sheet pan with parchment paper or a silpat (nonstick) liner, add the frozen shapes and bake until the edges are a light golden brown and the center feels just set.

Important note about the dough: Since the dough is make primarily of butter, it softens very, very quickly. If you need it to harden a bit before working with it, I roll out the dough between two wax sheets of paper . That way, if it gets too soft, I can throw it back into the freezer for a few moments and then bring it back out. That way none of the dough sticks to your counter top or cutting board, either!

To make the royal icing: Put sifted powdered sugar and cream of tartar into the bowl of a standing mixer, fitted with the paddle attachment. (I found you can also do this in a large bowl with a stainless steel whisk). Start the mixer running and begin streaming in one egg white at a time, mixing until the mixture comes together and resembles the consistency of toothpaste. I find that's about the equivalent of 2 egg whites. Add a third egg white if you're going for looser, runnier icing. If icing is too thick, as a tiny bit more egg white -- a little bit goes a LONG way -- until the proper consistency is achieved. If the icing is too thin, add a little more sifted powdered sugar until you get the consistency you're after. Store the icing in an airtight container, with a damp paper towel pressed to the surface of the icing. Wrap in plastic wrap twice. Keep refrigerated until ready to use. Keeps about 3-4 days.

Okay, now for the fun stuff! When I first thought to decorate the cookies in an argyle pattern, I knew I needed three shades of royal icing: sky blue and royal blue for the outlines and the argyle fillers, and white for the top decoration layer. Then came the issue of creating an argyle template for myself, because just like geometry in high school argyle can be tough to execute consistently; especially on 30 cookies. So I immediately made a template using a piece of wax paper and a ruler, creating a transparent argyle template that I could use as a guideline when piping each cookie. I then put each cookie on the template and made sure the lines matched up. Check out the template below:

Using a tiny bit of concentrated gel food coloring, I made three colors of royal icing: white, sky blue and royal blue

My wax paper argyle template - look carefully and you can see my pencil work

See how the icing lines on the cookie match the lines on the template?
After baking the dough I noticed that the cookies had changed their shape a bit, so I used a sharp knife to carefully cut off excess dough and shape the cookies into perfect rectangles. I then transferred the cookies to a cooling rack. When they were completely cool, I start piping. First, an outline on each cookie, followed by the argyle details. I let them both dry completely so when I flooded in the colors they wouldn't bleed into each other.

Royal blue outline first...

... then the argyle pattern.

Once the royal icing was dry, I flooded one section of argyle with a thinner version of the royal blue icing.

Then I followed by flooding the remaining diamonds with the sky blue icing.

Once the royal and sky blue icings had dried completely, I used a stiff white royal icing to pipe the decorative top lines. I think they look pretty good!

Then I delicately took the fondant "E's" and glued it onto each cookie with royal icing.

The finished product! Only 29 more to go...


7.09.2010

S'mores Pie: The Perfect Summertime Dessert!

I don't know who first invented the S'more, but I'd really like to kiss them. Or, considering my husband might not approve, just give them a really big hug. Just think about S'mores for a second. There's nothing better -- especially during a summer campfire, outdoor BBQ or even as an impromptu stove-top dessert -- than the combination of a perfectly-roasted marshmallow and melted square of chocolate, squished between two crispy graham crackers. For kids, S'mores are the perfect excuse to get messy with their food. For adults, S'mores are the perfect excuse to act like a kid again. It's the ultimate win-win dessert.

Photo courtesy of CampWisconsin.com

Making the perfect S'more is an art form, and everyone has their own technique. You know it's true. Once you get that soft, jet-puffed marshmallow in your hands and secure it to the roasting skewer, it gets personal. Do you go for the scorching method, roasting your marshmallow in a blaze of carmellized-sugar glory? Or are you the perfectionist, constantly turning your marshmallow rotisserie-style until it's the perfect shade of toasty brown? Do you break the chocolate into pieces, making sure you get some in every bite? Or do you even get that far, instead abandoning the sandwich and popping the roasted marshmallow straight from the skewer?

Whatever your technique, the result is the same for kids and adults alike: a sticky, satisfied, chocolate-toothed grin. Especially for me. Which is exactly why I took the signature S'more and turned it into a pie for the Pie-a-Day Project. It's got a crushed graham cracker crust, chocolate ganache center and brûléed marshmallow topping. Just consider it the S'more for grown-ups. But don't worry, you can still lick your fingers.

S'mores: The Pie Version!

S’Mores Summertime Pie

Ingredients:
  • 1 1/2 cups cinnamon graham cracker crumbs (12-15 graham crackers)
  • 8 tablespoons melted butter
  • 7 ounces semi-sweet chocolate chips
  • 1 cup heavy cream
  • 1 egg
  • 1/2 teaspoon sea salt
  • 8 egg whites, room temperature
  • 2 cups sugar
  • 1/2 teaspoons cream of tartar
  • 2 teaspoons pure vanilla paste (I use Nielsen-Massey's Madagascar Bourbon Pure Vanilla Bean Paste)
1. To make the crust, break up the cinnamon graham crackers into the bowl of a food processor. Pulse until the crackers are finely ground. If you don't have a food processor, you can put the graham crackers into a large Ziploc bag and crush with a rolling pin or the back of a large spoon. Place the butter in a separate bowl and heat until melted through, either in the microwave or in a small pan. Pour the melted butter into the graham cracker crumbs and mix until the crumbs have completely absorbed the butter (the consistency will be like wet sand). Next, butter a 9-inch pie pan and firmly press the graham cracker crumbs against the bottom and sides of the pan, making sure it is an even layer. Hint: the bottom of a measuring cup is great for smoothing out the crust and pushing it up against the sides of the pan. Place the pie pan in the refrigerator to chill for at least 30 minutes (if you're in a rush for time, 15 minutes in the freezer works well, too).

I use cinnamon graham crackers from Trader Joe's.
Crumble graham crackers into the bowl of a food processor.

Pulse until graham crackers are finely ground.

Melt butter and combine with crushed graham cracker crumbs.

Mix butter and crumbs until the consistency is like wet sand.

Spread evenly in a pie dish and chill for 20-30 minutes.
2. While the crust chills, make the chocolate filling. Preheat the oven to 350 degrees. Put the chocolate chips in a large glass or stainless steel bowl. Heat the cream in a saucepan until it is scalded (but not boiling). Pour the cream over the chocolate chips and let it stand for 1-2 minutes. Using a metal whisk, combine the cream and chocolate together until all the chocolate is melted and the mixture is glossy and smooth. Add the salt and one egg into the chocolate mixture and whisk to fully combine. The mixture should be thick, similar to pudding. Remove the crust from the refrigerator or freezer. Pour in the chocolate mixture and spread to edges of crust. Bake for 25 minutes, or until the filling is mostly set but a little wobbly in the center. Remove from the oven and let cool.

Place chocolate pieces in a bowl.
Pour scalded cream over chocolate. Let sit for 1-2 minutes.

Whisk until chocolate mixture is silky smooth.

Add salt and one egg. Whisk until combined. Pour chocolate mixture into cooled pie crust.

Bake until mixture is set but still wobbly in the middle.
3. While the pie is cooling, start the marshmallow topping. Combine the egg whites, sugar, and cream of tartar in a double boiler over medium-high heat. Whisk frequently, checking the temperature with a candy thermometer until it reaches 160 degrees (the mixture should be opaque and starting to thicken). Transfer the mixture to a standing mixer fitted with a whisk attachment. Mix at low speed, gradually increasing to medium-high speed as the mixture thickens. Beat until the mixture is glossy and forms stiff peaks. Add the vanilla paste and mix for another 10-15 seconds, until it is just combined.

Put egg whites, sugar and cream of tartar in a double boiler. Whisk until is reaches 160 degrees.
When marshmallow reaches 160 degrees, transfer to mixing bowl and whip until light and fluffy (I forgot to take a photo of the finished marshmallow, sorry!)
4. It's time to add the marshmallow topping. Put the marshmallow mixture into a piping bag fitted with a large star tip. Starting in the center of the pie and moving outwards, pipe one to two-inch tall stars, pulling the piping tip straight up and gradually decreasing the pressure as it pulls away from the pie. Repeat until entire pie surface is covered with marshmallow stars.

Pipe marshmallow onto cooled chocolate layer.
To brûlée the marshmallow, I prefer to use a culinary propane torch, available at most hardware or cooking stores. Carefully ignite the torch and slowly move the flame back and forth over the top of the marshmallow until it starts to look "toasted." If you don't have a culinary torch, you can brûlée the topping in the broiler of your oven. Just cover the crust with foil (to prevent it form burning) and broil it for 2-3 minutes. Keep a close eye on the pie so it doesn't go from brûléed to burned.

Watch the marshmallow topping as it brûlées in the broiler. It can go from brûléed to burned in an instant!
5. Serve and enjoy! Helpful hint: when serving, dip a sharp knife in hot water and then cut through the pie. The heat helps the knife easily cut through the marshmallow.

Use a knife dipped in hot water to cut beautiful pieces of pie. Or just dig in with a fork; it's your choice!
This s'mores pie won't last long!


Related Posts with Thumbnails