10.31.2010

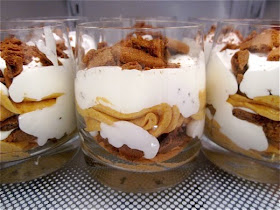
Gourmet Magazine's Pumpkin Gingersnap Parfait

Finally, I get to make this gingersnap pumpkin parfait. I've had this recipe in the blog hopper, so to speak, since fall of last year. Why so long? There was never the "right" time to make it, because by the time I thought about it, fall was long gone. And no one wants to make a pumpkin recipe in April. This recipe, courtesy of Gourmet Magazine, is great. The hardest part of the recipe requires you to "bloom" gelatin over warm water for a minute. If you can handle that -- which I know you can -- then you're good to go.

Pumpkin Gingersnap Parfait
From start to finish the parfaits took me about one hour to make, which doesn't take into account time spent wondering if I just should just eat the whipped pumpkin creme directly out of the bowl (I did not). If you're in a time crunch, you can make the parfaits one day ahead of time and let them just chill out in the fridge. I also recommend using either Ziploc-turned-piping bags or professional pastry piping bags to layer the pumpkin mixture and whipped cream. That way you end up with the clean layers inside the glass, rather than all over the sides. Here's how you make them:

Ingredients:
  • 1 envelope unflavored gelatin (2 1/4 tsp)
  • 1/4 cup cold water
  • 1 (15-oz) can pure pumpkin
  • 1/2 cup packed light brown sugar
  • 1/2 teaspoon cinnamon
  • 1/2 teaspoon nutmeg
  • 1/4 teaspoon ground ginger
  • 1/8 teaspoon salt
  • 2 1/4 cups chilled heavy cream, divided
  • 1 1/2 teaspoons pure vanilla extract, divided
  • 20 gingersnap cookies, coarsely crushed
  • EQUIPMENT: 8 (6- to 8-oz) glasses
Directions: Sprinkle gelatin over water in a small saucepan and let soften 1 minute. Bring to a bare simmer, stirring until gelatin has dissolved. Whisk together gelatin mixture, pumpkin, brown sugar, spices, and salt in a large bowl. Beat 1 cup cream with 1/2 tsp vanilla until it holds soft peaks, then fold into pumpkin mixture gently but thoroughly. Beat remaining 1 1/4 cups cream with remaining 1 tsp vanilla until it holds soft peaks. Spoon about 1/4 cup pumpkin mixture into bottom of each glass, then sprinkle with some of cookies and top with about 2 Tbsp whipped cream. Repeat layers once, ending with cream. Chill until set, at least 2 hours. Note: Parfaits can be made up to one day in advance and chilled.

Pumpkin Parfaits: Step By Step

Need some more guidance? Here are step-by-step photos. Hopefully they're helpful!

Step #1: Pipe a layer of pumpkin mixture into bottom of each glass

Step #2: Sprinkle crushed gingersnap cookies over pumpkin mixture

Step #3: Layer whipped cream

Step #4: Pipe another layer of pumpkin mixture

Step #5: Sprinkle another layer of crushed gingersnap cookies

Step #6: Pipe another layer of whipped cream

Step #7: Sprinkle a few more crumbles of gingersnap cookies

You're all done! Stick the parfaits in the refrigerator for a few hours and serve up to one day later. If you can wait that long!

Pumpkin Parfait: Just Chill & Enjoy


Trick Or Treat: Halloween Chocolate Peanut Butter Bark

Happy Halloween! If you're in need of a last-minute (trick or) treat for tonight, here's a fast and fabulous recipe that is sure to get your ghoulish guests chattering. It's my take on a "Halloween Peanut Butter and Toffee Candy Bark" recipe from this month's Bon Appétit Magazine. All you need to do is buy one pound of bitter- or semi-sweet chocolate chips, melt it, spread it on a sheet pan, and throw on some of your favorite Halloween candies. Couldn't be easier or more in the Halloween spirit! Full recipe and step-by-step photos below.

Halloween Chocolate Candy Bark

Ingredients:
  • One pound + three ounces bitter- or semi-sweet chocoalte chips
  • Four packages of full-sized Reese's Peanut Butter Cups, cut into eight wedges
  • 1 1/2 cups pretzel M&Ms, crushed
  • 1 1/2 cups Reese's Pieces candies (orange, yellow and brown)
  • 1 1/2 cups candy corn
  • Optional: Three 1.4-ounce Skor or Heath toffee candy bars, cut into irregular 3/4" pieces
  • Optional: 1/4 cup honey roasted peanuts
My toppings of choice
Directions: Line baking sheet with parchment paper (aluminum foil will work as well). Stir one pound of chocolate chips in heavy medium saucepan over low heat until melted and warm (NOT hot) to the touch. Pour chocolate onto parchment; spread to 1/4-inch thickness (about 12x10-inch rectangle). Arrange peanut butter wedges throughout chocolate, pressing gently so they're secure. Sprinkle crushed M&Ms, Reese's Pieces and candy corn, making sure all pieces touch melted chocolate layer so they adhere. Melt the remaining three ounces of chocolate in saucepan. Stir constantly over very low heat until chocolate is warm (again, not hot) to the touch. Remove from heat. Dip spoon into chocolate and wave from side to side over the bark, creating a zigzag pattern. Chill bark until firm, about one hour. Slide parchment with candy onto cutting board or other flat work surface; peel off parchment and cut bark into irregular pieces. Important note: Don't break the chocolate with your hands; the warmth from your fingertips will leave fingerprints. Serve in bowls, put into gift bags or store in refrigerator until ready to serve.

Step #1: Spread melted chocolate into 1/4" layer on parchment-lined sheet pan

Step #2: Arrange wedges of Reese's Peanut Butter Cups on chocolate layer

Step #3: Sprinkle candies on chocolate layer, making sure they touch melted chocolate

Step #4: Chill bark until firm, about one hour. Then transfer parchment layer and candy to flat work surface.

Step #5: Chop into irregular pieces and store in your favorite Halloween container. Serve and enjoy!

Not into Halloween Bark? Try pumpkin spice cupcakes with piped frosting and a candy corn on top!

10.27.2010

Eastbound and Down to Montclair's Tacos Palmitas

It's been a rough couple of weeks. Health insurance fiascos, rescinded job offers, car problems and an apartment that is crumbling before my eyes. Basically, if it was crappy, it happened to me. So instead of breaking down in tears (again) or wondering why the heck the world has decided to use me as its punching bag, I did something much more reasonable. I went out for Mexican food. In Montclair.

Taco Palmitas Asada & Carnitas Vampiros
Now if you live on the Westside of Los Angeles, as most of our friends do, you might ask yourself, "Where exactly IS Montclair?" Well, I'll tell you. It's about an hour east of Los Angeles on the 60 freeway. So when I offered to head east with my Mom to help her pick up some work orders, I had no idea that we were headed to one of the Meccas of Mexican food. I mean, Jonathan Gold could have probably told me that, but unfortunately I don't have a direct line to the ethnic food aficionado himself.

Instead I found it for myself in a tiny, strip mall restaurant called Tacos Palmitas. Walking in, it's a decorate-by-numbers kind of Mexican cafe. Tile floors, Southwestern-themed wooden tables and chairs, wagon wheels hung under the counter, a small yet thorough collection of Jesus and Mary photos lining the walls. But it was a warm welcome from Vianey behind the front counter and a quick glimpse at both the authentic, bottled Mexican beverages and homemade condiment counter that sold us. The menu is thorough, if not filled with traditional south-of-the-border cuisine like tacos, burritos, tortas, combo plates, vampiros (similar to tostadas) and an all-day desayunos (breakfast) menu.

Tacos Palmitas Interior

The Menu
I opted for a carnitas (pork) and an asada (beef) vampiro, which are essentially tiny tostadas layered with meat, diced white onion, cilantro, cabbage and salsa. My mom, nothing if not slightly unadventurous (love you, Mom!), went for a bean and cheese burrito. But just as I was about to encourage her to add Carne Asada (or just something else, for God's sake), I spotted them hiding in the open kitchen: homemade Chili Rellenos, possibly one of my mom's favorite Mexican food items ever. They weren't cooked, mind you, and they weren't on the menu either. They were a special of the day; 12 huge, freshly roasted poblano peppers sitting next to Juan, the one and only cook in the place. He had just filled them with chunks of cheese and cinched them closed with toothpicks. It was a no-brainer; I looked at my Mom, looked back at Vianey and simply asked, "How long until the Rellenos are ready?" "About 30 minutes," she replied. "We'll wait."

Carne Asada and Carnitas Vampiros
Mom's Bean & Cheese Burrito (I kid, but it was one of the best B+C's she's had)
Not being one to pass up an opportunity to document the making of 100% authentic Chile Rellenos, I asked Vianey if I could take a few photos of Juan as he worked. I stayed to the side, shooting a few photos of Juan working as he tried to hide his smile. First, he heated about an inch of vegetable in a well-seasoned cast iron skillet. While it warmed, he coated the poblanos with a light dusting of flour and set them aside. Then came the egg batter, made from scratch by whipping eggs whites into a serious frenzy and folding in their yolky counterparts. As he was about to dip the chiles into the batter he ushered me closer, wanting me to catch every step. He dipped the chiles into the almost pancake-like batter, and then gingerly laid them tip-first into the hot oil. The coating began to puff immediately, turning golden brown in a matter of moments. He added two more peppers, flipping them over to cook on both sides, and laid them on his industrial cooktop to rest.

Worth the Wait: Juan's Chile Rellenos

Juan working his Chile Relleno magic

Look at that batter puff up in the hot oil

Chile Rellenos, fresh out of the cast iron skillet
Admittedly, I'm a picky one when it comes to meat. Especially beef. I'm the girl who really detests hunks of fat or cartilage in her meal, whether it's in a taco, a burrito, a wrap or just protein on a plate. But these vampiros were excellent. The meat was moist, tender, chopped into bite-sized chunks and topped with a light and refreshing mix of raw white onions, cilantro, cabbage and salsa. And as much as I joke around, my Mom's burrito was actually great. The tortilla, if not homemade by Juan, was certainly made earlier that day by someone who knows their craft. The beans were light and the cheese was nowhere close to the American or Cheddar monstrosity you sometimes find in imitation Mexican restaurants. But the real winner was Relleno; we got it to go because we knew we'd be full from our other treats, but snuck a bite before heading out. Right away I noticed that it was not greasy, which can be a major Relleno faux pas. Instead, the batter was incredibly light and fluffy, the pepper still held its structural integrity, and the cheese was gooey, salty and incredible. The combination came with rice and beans, but we went straight for the good stuff.

The finished product, topped with Juan's homemade salsa
After all was said and done, we had happy, full tummies and a $17 bill. A win-win if there ever was one.


10.07.2010

Earning My Stripes: Argyle Sugar Cookies

I think I've got a problem. For the third or fourth time, I've taken on a substantial dessert project for a friend. A project that takes me a good solid week to accomplish. But that's NOT the problem; the "problem" is that I really, really love it and wish I could do it all the time. I realized I get a sick amount of satisfaction and joy from sitting at my dining room table (my kitchen is just way too small) and rolling out dough, shaping cookies, setting up cooling racks and then -- for HOURS -- piping layers of elaborate decorations on cookie after cookie after cookie. I can spend as much time happily doing that as my husband can watching football for days at a time. It's kind of sick, but I guess we've all got our thing.

My latest "project"...

...Argyle sugar cookies with a fondant initial for a friend's baby shower
So what was the project this time? Custom-designed sugar cookies for a circus-themed baby shower. Specifically, I made 30 rectangular sugar cookies piped with a dual blue argyle pattern to match the baby shower invitation. Oh, and I also created 30 white fondant "E's" (the baby's name is Ethan), brushed them with luster dust (basically sparkle powder you mix with vodka and paint on the fondant), piped a white border and added white sanding sugar to each. Yeah, so that also goes on each cookie. Like I said, I think I have a problem...

Fondant "E's" - The baby's name is Ethan
If you have a "problem" similar to mine -- basically, an insane love for baking and arts & crafts -- here are the cookie and icing recipes plus step-by-step instructions and photos. Note that I've left out photos of mixing, rolling and cutting out the dough and have gone straight to the decorations. If you'd like to see the dough prep photos, check out my earlier sugar cookie project post here. Enjoy!

Sugar Cookies
  • 25 ounces (3 cups, 1 ounce) pastry flour or all-purpose flour
  • 11 ounces (1 cup, 3 ounces) sugar
  • ½ teaspoon salt
  • 1 pound (equivalent of four sticks) butter, chilled and cut into cubes
  • 1 tablespoon + 1 teaspoon vanilla (I prefer Madagascar vanilla paste)
  • 2 ounces cream cheese, room temperature
Royal Icing
Yields approximately 2 1/2 cups
  • 16 ounces powdered sugar, sifted at least once
  • 2-3 large egg whites (I used pasteurized egg whites in a carton, which is safer for pregnant women and children)
  • 1/4 teaspoon cream of tartar
To make the sugar cookies: Add all dry ingredients into a standing mixer with a paddle attachment. Mix on LOW until combined. If you put it on a higher setting, you'll end up wearing the dry ingredients. With mixer running on low, add in the cold butter pieces a few at a time until a crumbly, wet dough starts to form. You may to increase to speed as the dough thickens. Make sure you do not let it come together into a ball of dough, as you still have to add the cream cheese and vanilla paste. With the mixer still running, add the vanilla paste and cream cheese and mix on low until dough forms large clumps. Turn the dough out onto a clean surface and knead lightly to finish. Break the dough into four equal portions and rap in plastic (13-14 oz. each). Chill for at least an hour, then roll out until the dough is 3/8”-1/4” thick. Cut or shape as desired. Re-roll scraps only once. Freeze shapes before baking and do NOT thaw before putting them in the oven. When ready to bake, preheat oven to 325 degrees. Line a sheet pan with parchment paper or a silpat (nonstick) liner, add the frozen shapes and bake until the edges are a light golden brown and the center feels just set.

Important note about the dough: Since the dough is make primarily of butter, it softens very, very quickly. If you need it to harden a bit before working with it, I roll out the dough between two wax sheets of paper . That way, if it gets too soft, I can throw it back into the freezer for a few moments and then bring it back out. That way none of the dough sticks to your counter top or cutting board, either!

To make the royal icing: Put sifted powdered sugar and cream of tartar into the bowl of a standing mixer, fitted with the paddle attachment. (I found you can also do this in a large bowl with a stainless steel whisk). Start the mixer running and begin streaming in one egg white at a time, mixing until the mixture comes together and resembles the consistency of toothpaste. I find that's about the equivalent of 2 egg whites. Add a third egg white if you're going for looser, runnier icing. If icing is too thick, as a tiny bit more egg white -- a little bit goes a LONG way -- until the proper consistency is achieved. If the icing is too thin, add a little more sifted powdered sugar until you get the consistency you're after. Store the icing in an airtight container, with a damp paper towel pressed to the surface of the icing. Wrap in plastic wrap twice. Keep refrigerated until ready to use. Keeps about 3-4 days.

Okay, now for the fun stuff! When I first thought to decorate the cookies in an argyle pattern, I knew I needed three shades of royal icing: sky blue and royal blue for the outlines and the argyle fillers, and white for the top decoration layer. Then came the issue of creating an argyle template for myself, because just like geometry in high school argyle can be tough to execute consistently; especially on 30 cookies. So I immediately made a template using a piece of wax paper and a ruler, creating a transparent argyle template that I could use as a guideline when piping each cookie. I then put each cookie on the template and made sure the lines matched up. Check out the template below:

Using a tiny bit of concentrated gel food coloring, I made three colors of royal icing: white, sky blue and royal blue

My wax paper argyle template - look carefully and you can see my pencil work

See how the icing lines on the cookie match the lines on the template?
After baking the dough I noticed that the cookies had changed their shape a bit, so I used a sharp knife to carefully cut off excess dough and shape the cookies into perfect rectangles. I then transferred the cookies to a cooling rack. When they were completely cool, I start piping. First, an outline on each cookie, followed by the argyle details. I let them both dry completely so when I flooded in the colors they wouldn't bleed into each other.

Royal blue outline first...

... then the argyle pattern.

Once the royal icing was dry, I flooded one section of argyle with a thinner version of the royal blue icing.

Then I followed by flooding the remaining diamonds with the sky blue icing.

Once the royal and sky blue icings had dried completely, I used a stiff white royal icing to pipe the decorative top lines. I think they look pretty good!

Then I delicately took the fondant "E's" and glued it onto each cookie with royal icing.

The finished product! Only 29 more to go...