11.20.2009

You're Making 300 WHAT???

This is the question that I've been getting from more than a few people this past week.

Why?

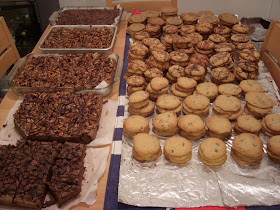
Because I decided to make 300 bags of cookies and brownies for the Laughs For Bald Bryan VIP reception. Since I've been baking so much lately I decided that I'd really love to make a bunch of cookies and brownies as a "thank you" to the people in the VIP section. I would've made 1200 of them, but that was ridiculous. Bryan and I have been really overwhelmed at the response to tonight's (EEK!) fundraiser and wanted to thank people. We weren't sure how, until I offered up my baking services. Since we've had a pretty quiet week, I've had a lot of time to get baking done. I baked for about 7 hours on Wednesday afternoon/night. Turns out that was the "easy" part, as cutting and inserting turtle brownies into little cellophane bags can be a pretty sticky situation. Pun intended.

Regardless, this is my first big baking adventure and it was really fun. If you're at the VIP section tonight, make sure to grab a cookie or brownie bag. There are turtle brownies, peanut butter swirl brownies, sea salt/chocolate cookies, peanut butter cup cookies and toffee crunch cookies. Yum!

11.17.2009

Chocolate Chips + Sea Salt + Walnuts + YUM!

It's hard for me to find a really great cookie. I mean, a REALLY great cookie. The kind of cookie that makes your mouth water long after you've finished it and makes you wish you had – oh, I don't know – about 20 more.

Well, as part of my recent baking binge, I decided to created some of my own custom cookie recipes. It was purely selfish as I went through a mental list of some of my personal favorite flavors. And I'm not just referring to "cookie" or "dessert" flavors. Rather, I'm talking about the fantastically delicious combination of savory and sweet.

So after much thought, here's what I came up with: Chocolate chip, walnut and sea salt cookies with a hot fudge drizzle.

Umm, I don't mean to embarrass you, BUT...there's a not-so-tiny bit of drool on your lower lip. Might want to clean that up before reading further. :)

Here's the recipe. If I don't say so myself, these are seriously killer cookies. They are chewy, nutty, chocolate-y, salty, and a bit crisp all at the same time. I made so many that I gave boxes of them to about 10 friends. There have been requests for seconds and in some cases, thirds. If you make them, I hope you have the same result!

Chocolate Chip, Walnut, Sea Salt Cookies + Hot Fudge Drizzle

  • 2 1/4 cups all-purpose flour
  • 1 teaspoon baking soda
  • 1 teaspoon sea salt
  • 1 cup (2 sticks) butter, softened (45-60 seconds in the microwave usually does the trick)
  • 3/4 cup granulated sugar
  • 3/4 cup packed light brown sugar
  • 1 teaspoon vanilla extract (I use Bourbon vanilla extract for an added kick)
  • 2 large eggs
  • 3-4 cups (36-48 ounces) Semi-sweet chocolate chips (I use Trader Joes or Nestle Toll House Chocolate Morsels)
  • 2 cups walnut baking pieces (I get these from Trader Joes as well...they have great prices on nuts)
  • Sea salt grinder
  • Hot fudge of your choice

Preheat oven to 375 degrees. Combine flour, baking soda and salt in a medium-sized bowl. You don't have to sift the ingredients, but definitely whisk to combine. Beat the softened butter, granulated sugar, brown sugar and vanilla in a bigger bowl until creamy and all lumps are broken up. Add eggs, one at a time, beating well until combined. Gradually add the flour mixture to the wet mixture, a small bit at a time. Once both mixtures are combined and the batter is smooth, stir in the chocolate chips and walnut pieces. Note: the batter will be really chunky after adding the chocolate chips and nuts.

Line two baking sheets with parchment paper or nonstick "silpat" sheets. Drop generous spoonfuls of batter onto the baking sheet, using your fingers to shape. Keep about 3" between spoonfuls. You should be able to fit about 12 spoonfuls of batter on each baking sheet. Using a sea salt grinder, grind one "turn" of salt on top of each cookie. It's up to you if you want more salt, but I've found that any more than one turn of the grinder makes the cookies too salty.

Once the salt has been added, dip the tip of a small spoon into the container of hot fudge. I'd recommend doing this over the baking sheet so you don't have to go far, e.g. not "drizzling" your kitchen floor with hot fudge. Remove the spoon slowly and until the fudge starts to "drizzle" from the tip of the spoon. Drizzle the hot fudge on top of each spoonful of dough. I usually drizzle about 5-10 thin lines of hot fudge on each scoop of dough. Don't worry if the hot fudge gets on the tray in between each scoop of dough; the cookies will bake and expand over the excess hot fudge drizzle.

Bake the cookies for 10-12 minutes or until barely golden brown around the edges. Remove the cookies from the oven and wait about five minutes before transferring to a cooling rack (when warm, the cookies are very delicate). Once the cookies cool, the hot fudge will create a crispy, caramelized crust around the edge of the cookie. But good luck waiting that long.

Makes about 3 dozen cookies. Ignore the images of the Toffee crunch and mini peanut butter cup cookies. Recipes for those to come later!

11.14.2009

Turning a Losing Streak Into Deliciousness

Today was USC's homecoming football game against Stanford. Homecoming is obviously a big "RA-RA-GO-USC!" kind of day, so Bryan and I really wanted to go see a lot of our friends at his fraternity's tailgate. It's easier than it sounds, because Bryan and I haven't been to a football game this season for obvious reasons...cancer recovery doesn't exactly bode well for maneuvering through a 90,000+ person crowd. To make sure that we didn't miss Homecoming, a few of our friends were extraordinarily helpful by giving us an on-campus parking pass as well as arranging for a golf cart to take us directly to the tailgate. Talk about first class! Nevermind that our friend driving the golf cart was drinking Wild Turkey directly out of a Snapple bottle; that's a story for another time.

We made it safely through the tailgate and got to rally with friends for a few hours. Campus was a sea of Cardinal and Gold with such a great vibe; everyone was excited, energized and ready for a great game day. Bryan and I stayed at the tailgate until just before noon, then were shuttled back to our car to make sure we got home to see kick-off at 12:30pm.

That was about when the positivity ended. Stanford scored twice in the first quarter, leaving me with a "sinking ship" kind of feeling. While I'm a big USC football fan, Bryan is DIE HARD. So about halfway through the second quarter, I couldn't take it anymore. While he sat and supported our team and FOX Sports' ratings, I needed to do something else to keep me from focusing on a losing game.

So I went into the kitchen, scoured through the cabinets and decided that even if USC couldn't win, I could salvage the day by whipping up some fun Fall-themed treats. After a survey of ingredients, I started on a batch of Pumpkin Cupcakes. But – you might be saying – didn't I just make pumpkin cupcakes earlier this week? Yes, I sure did. And today wasn't a time for a new recipe; it was a time for something comfortable, reliable and delicious.

But that doesn't mean I didn't put an entirely new spin on it.

The recipe is the same as my earlier Pumpkin Cupcake recipe, but this time I decided to be much more experimental with the icing flavor and application. I followed the traditional cream cheese frosting recipe but added about two tablespoons of cinnamon and a 1/2 teaspoon of pumpkin pie spice. I used an electric mixer to get the icing to it's "creamy and fluffy happy place" (or is that my happy place?) then scooped it into two piping bags with different tips (tips #22 and #31 from Surfas, I believe).

Now by no means am I a master piper. I'm barely a novice piper, if you can even call if that. My "piping" experience consists of being creative enough to scoop frosting into a Ziploc bag, cut off the corner tip and "pipe" from the bag. No professional tip, bag, nothing. It's always come out well, but every time I start I have the fear that the result will look like a kindergarten art project. Cute, but in an "Awwww, I have to put this finger painting on my refrigerator but don't really want to" kind of way. Luckily, it's never gone that south.

Today's piping experience was more difficult because I was using tools I've not used before. A professional piping tip, a professional piping bag, and a "attachable ring" that you can use to exchange various tips without switching to an entirely new bag. I was really excited, but the situation got messy. Really messy. Cinnamon frosting was everywhere; on my hands, the cutting board, the bowl, the bag, spoons, the counter. You name it, it was frosted. But that's okay, because my kitchen turned into an edible Cinnamon wonderland. It's not like gardening or painting, because you can't exactly lick dirt or oil-based paint off of your fingers. I suppose you could, but you might have serious mental and physical problems.

After all was said and done, the piping ended up going quite well. A few cupcakes ended up as sacrificial lambs, but it didn't matter because it gave me an excuse to eat them. You can't have ugly cupcakes sitting around, right? Right.

You can see my piping attempts in the photos, as well as some Pumpkin Chocolate Chip Cookies I made from the last bit of the pumpkin cupcake batter. I just threw in a handful of semi-sweet chocolate chips, scooped them onto a Silpat-lined baking sheet and baked them for about 12 minutes. Since the batter had baking powder in it, the cookies turned out much fluffier than my tried and true cookies. A different, yet equally delicious result.

So while USC ended up losing miserably to Stanford, I turned lemons into lemonade. Or rather, a losing streak into deliciousness. Yum.

11.13.2009

Lunch Truckin'

Last week, our friend and LAist.com writer, Caleb, took Bryan and me on our first Los Angeles lunch truck excursion. Caleb wrote the LAist.com story on Bryan and I, as well as the story about Bryan's benefit. It may be hard to believe that two foodies have not have branched out to locally famed food trucks, but suffice it to say we've been a bit preoccupied for the past few months.

For anyone not familiar with the lunch truck phenomenon, gone are the days of the "Roach Coach" and rampant food poisoning. Rather, today's resurgence of lunch trucks includes everything from a gourmet GastroBus to a Grilled Cheese truck to the long-awaited Buttermilk truck, serving red velvet pancakes and Hawaiian bread cinnamon french toast sticks. That's right, these are farmer's market-supporting, organic produce-buying, legitimate permit-holding food trucks ready to improve the lunch hours of Los Angeleno's everywhere.

While some may say the lunch truck trend resembles more of an epidemic, Bryan and I had yet to partake in this cheap and delicious outing. And really, trucks that serve nothing but some of our foodie faves is a can't miss for us. Especially when we had a guide like Caleb, also author of a "Recession Obsession" article series that highlights some of L.A.'s best cheap eats.

Caleb came over promptly at noon and immediately loaded up the Google Maps equivalent to finding L.A. food trucks. FindLAFoodTrucks.com revealed the locations and tweets (oh yes, the trucks tweet) of each of food truck. We narrowed it down to two trucks – GastroBus and Marked 5 – hunkering down near Maple and Beverly Drive in Beverly Hills.

Marked 5 is a really interesting, Japanese burger truck. While the beef, pork, tofu and curry chicken burger options were fairly traditional, the Japanese twist on the bun was certainly not. The burger "buns" were made from pressed and grilled sushi rice patties. Bryan got the beef burger, Caleb got the pork and I got the curry chicken. The rice "buns" surprisingly held their structural integrity and the lightly toasted outside made for a really nice, subtle crunch. The chicken cutlet itself was nothing special, but the curry and the cool coleslaw added a great hot/cold contrast with the chicken and the rice patty. Bryan thought his beef burger was great but generally too messy. He lost the fight against the crumbling beef and rice combo about 3/4 of the way through, and pretty much threw in the paper napkin. Caleb enjoyed his pork burger, but I don't remember him raving about it. All in all, the burgers were really interesting and we were happy we branched out and tried something new. Caleb paid for the burgers so I don't know how much they cost, but I believe they were in the $5 range.

After Marked 5, we walked, oh, 30 feet down the block to the GastroBus. Now, this truck really looked like it had some potential. All of the GastroBus's produce is from the Los Feliz farmers market and their handwritten, chalkboard menu changes daily. There was originally a really long line, which is why we chose to hit Marked 5 first. Once it was our turn in order, we went for the big guns. We treated Caleb to a smoked bacon sandwich, Bryan got a skirt steak sandwich, I got a pulled pork sandwich and we got sweet potato fries and corn cakes for the group.

Yeah, it was a lot of food. But hey, it was our first time there and it cost less than $10 per person. Not bad.

We parked ourselves at a chest-high, concrete slab and went to town. The bacon sandwich was essentially a BLT but it was on lightly toasted potato bread, which added a warm, pillowy element to the crunchy bacon and crisp lettuce and tomato. Bryan's skirt steak sandwich was on ciabatta, and it was fantastic. One thing we really appreciated about the sandwich was that biting through the skirt steak was easily manageable. Because, honestly, there's nothing worse than eating a steak sandwich and having the entire piece of steak sliding out on your first bite. You shouldn't have to attack your sandwich like a pit bull might a large piece of meat; rather, you want a well-seasoned, yet tender piece of beef in each bite. And that's exactly what we got from GastroBus's skirt steak sandwich. It was great.

Finally, my pork sandwich was excellent and surprisingly light. It was on a crusty yet soft roll and had a great crisp, crunch from the lettuce and pickled onions. It may have been our favorite sandwich of the bunch. As for the sides, the sweet potato fries were well, sweet potato fries. Solid but nothing special. But speaking of special, the corn cakes were wow-wow-wow good. They were essentially light and fluffy pancakes with a heavy sprinkling of fresh, sweet white corn. Ohmygosh they were so good. They came with a big scoop of fresh ricotta cheese and shaved scallions. Even after the boys were done eating, I had resorted to eating the corn cakes with my fingers. I'm definitely going to try and replicate them at home.

Overall, our lunch truck outing was a huge success. I've since bookmarked FindLAFoodTrucks.com and Bryan and I are going to look for some other interesting ones soon. If you can handle eating standing up, cleaning up after yourself and enjoying some fun (and nontraditional) food on a limited budget, it's a great option.

Next time, Buttermilk Truck, here we come...

11.12.2009

Turtle Brownies

My good friend, Erika, has been our sweet-toothed superhero, bringing treats to Bryan and I throughout his treatment period. Early on, when Bryan didn't have much of an appetite (that's an understatement), Erika emailed and asked what type of sweet Bryan was craving. I had grown accustomed to making all the food-related decisions in our household, so I was expecting Bryan to answer with an underwhelmed "whatever she wants to bring."

Lo and behold, I got a huge surprise when I asked Bryan, "what sweet do you want Erika to make?" and he practically screamed, "TURTLE BROWNIES!!!"

It was like one of those Christmas home videos where a kid opens the present of their dreams and starts to act eerily similar to a mental patient. Screaming, jumping, whooping and hollering, all in the name of some immobile action figure or streamer-laced bicycle. Minus the jumping, Bryan was similarly passionate about the idea of turtle brownies.

So Erika, being the slight overachiever that she is, took on the task of making – from scratch, mind you – not just brownies, but TURTLE brownies. That means slaving over a homemade caramel, pecan topping and even a chocolate ganache drizzle. When she emailed and said she was on her second batch of homemade caramel because the first one hadn't turned out so great, I felt terrible. I had visions of hot sugar burns in my head, but thankfully, that didn't happen. A week later, Erika stopped by with the world's great batch of brownies. And while I have a tendency to exaggerate, this is no exaggeration. These brownies are like crack, and while time-consuming, I've gotten them down to a two-hour relay, start to finish. If you're not a fan of nuts, I've substituted the turtle topping for Trader Joe's mini chocolate peanut butter cups. Equally delish for the peanut butter fanatic.

Here's the recipe and some photos. I've said it before and I'll say it again, these brownies are like food porn. Enjoy.

Chocolate Chip Brownies
  • 2/3 cup butter
  • 1 1/2 cups sugar
  • 1/4 cup H2O
  • 24 oz semi-sweet chocolate chips (separated into 12 oz)
  • 2 tsp vanilla
  • 1 1/2 cups flour – unsifted
  • 1/2 tsp baking soda
  • 1/2 tsp salt
  • 4 eggs
Preheat oven to 350 degrees. In medium pot, heat butter, sugar and water until butter melts. Stir in 12 ounces of chocolate chips and the vanilla. Cool to room temperature (I cheat and put the bowl in the freezer, stirring every few minutes to release the heat). Once the chocolate mixture has cooled, whisk in the eggs, one at a time. Add flour, soda and salt and add to chocolate mixture and whisk well. Add remaining 12 oz chocolate chips. Pour into 9”x13” greased or parchment-lined pan and cook for 40-45 minutes.

Caramel/Turtle Topping
  • 1 cup plus 2 tablespoons (225 grams) granulated white sugar
  • 1/2 cup (120 ml) light corn syrup
  • 5 tablespoons water
  • 1/8 teaspoon salt
  • 1/2 cup (120 ml) heavy whipping cream
  • 1 1/2 teaspoons pure vanilla extract
  • 2 cups (200 grams) pecan halves, toasted
I usually get this started about halfway through the brownies' cooking time. In a three quart heavy saucepan, combine the sugar, corn syrup, water, and salt. Over medium heat, stirring constantly with a wooden spoon or silicon spatula, bring the mixture to a boil. Once it boils, stop stirring, and cook the mixture until it turns a golden caramel color, about 15 minutes. Swirl the pan as needed so the caramel cooks evenly. Be careful of sugar crystals forming on the sides of the saucepan, as these can ruin the caramel. An easy fix? Once the sugar mixture starts to boil, put a lid on the saucepan for about 3-4 minutes. The resulting condensation will help remove any sugar crystals. Once the mixture starts to look the color of "caramel," remove from heat and CAREFULLY yet quickly add the cream and vanilla. The mixture will sputter and steam so be on the lookout for burns. Stir in the pecans and immediately pour over the still warm brownie layer, spreading evenly. The caramel will cool quickly and threaten to "rip" the brownies, so work fast. Let cool to room temperature, then cover and refrigerate brownies for about an hour or until the brownies are firm.

Chocolate Ganache Drizzle

  • 2 ounces (55 grams) semisweet chocolate, coarsely chopped (I forgo the chopping and just use semi-sweet chocolate chips)
  • 1/4 cup (60 ml) heavy whipping cream

Place the chopped chocolate in a heatproof bowl. Heat the cream in a small saucepan over medium heat (alternatively, heat the cream in the microwave but be careful as it will boil over quickly). Bring just to a boil. Immediately pour the boiling cream over the chocolate and allow to stand for 5 minutes. Stir with a whisk until smooth and silky. Remove the brownies from the refrigerator and, using a fork, drizzle the ganache over the brownies in a zigzag pattern. Cover and refrigerate until the chocolate is set. Using a sharp knife, cut the brownies into bars (however big or small you want!).

Store, covered, in the refrigerator for 7 to 10 days, or in the freezer for longer storage.

11.11.2009

I Need Some Comfort. Food.

As many of you may know from reading my other blog, An Inconvenient Tumor, my husband, Bryan, was diagnosed with a brain tumor last April. It's been a long eight months filled with fear, determination and hope. Bryan has fought through radiation and several rounds of chemotherapy, and the tumor has shrunk by more than half (great news!). He's doing really well but during his chemotherapy weeks, e.g. right now, he's exhausted. He sleeps about twelve hours per night and several hours during the day, leaving me with lots of time on my hands.

This whole period has forced me to re-evaluate what is important in my life and understand what I truly love. Because doing the things that I love gives me comfort, and being comforted helps me recharge my emotional and physical batteries. Hence starting this blog.

I've found great comfort in food, and most recently, in baking. Over the past few weeks I've been a baking maniac, whipping up dozens of cookies, brownies and as of last night, pumpkin cupcakes. I always start with a base recipe and then make it my own, because frankly it's more fun that way and I love to experiment with ingredients and flavors. So that's just what I did with last night's pumpkin cupcakes. Pumpkin is seriously one of my all time favorite flavors, so when Fall arrives and I start to see fresh and canned pumpkin lining grocery store shelves, I squeal with delight and start to clap. It doesn't matter who sees me; it's my little cheer to "welcome" the amazing fall flavors.

Here's the pumpkin cupcake recipe:

Pumpkin Cupcakes with Cream Cheese Buttercream

  • 2 cups all-purpose flour
  • 1 teaspoon baking soda
  • 1 teaspoon baking powder
  • 1 teaspoon coarse salt
  • 1 teaspoon ground cinnamon
  • 1 teaspoon ground ginger
  • 1 teaspoon freshly grated nutmeg
  • 1/2 teaspoon ground cloves
  • 1 cup packed brown sugar
  • 1 cup granulated sugar
  • 1 cup salted butter, melted and cooled
  • 4 large eggs, lightly beaten
  • 1 can (15 ounces) pumpkin puree (I used Libby's but you can use Trader Joes brand, etc.)

Preheat oven to 350. In a medium bowl, whisk together flour, baking soda, baking powder, salt and the spices. In another bowl, whisk together the butter, brown sugar, granulated sugar and eggs. Add dry ingredients and whisk until smooth. Then whisk in pumpkin puree.

Line the cupcake pan with liners and fill each about halfway with batter. To avoid mess, I scooped all the batter into a gallon Ziploc bag, cut off the corner and essentially piped the batter into each cup liner. Bake until tops spring back when touched and a cake tester comes out clean, about 20 to 25 minutes (I did 23 minutes). Transfer to wire rack and let cool completely before icing.

Cream Cheese Buttercream

  • 4 ounces unsalted butter, softened
  • 4 ounces cream cheese, softened
  • 2 cups powdered sugar
  • 1 teaspoon vanilla extract
In a large bowl, beat together the butter and cream cheese with an electric mixer or a whisk (a whisk can be tough on your hand, watch out!). With the mixer on low speed, add the powdered sugar a cup at a time until smooth and creamy. Beat in the vanilla extract and you've got yourself gorgeous, delicious buttercream icing. If you want to keep it simple, you can always use a simple spoon or knife to apply the frosting to each cupcake. However, to jazz it up, use a piping bag with a decorative tip to create a flower, zig zag or other fun pattern. Add even more personality and flair with colorful cupcake liners, sanding sugar or candy!

11.10.2009

Welcome to Pardon My Crumbs!

This food blog has been years in the making. Literally. As far back as I can remember, the vast majority of my favorite, most sentimental memories have revolved around food.

Every Christmas, my grandma and I would enjoy a special day of making gingerbread men. I wasn't tall enough to work on the kitchen counter, so we relocated our cookie base to the kitchen table. There I was, apron on and covered in flour, sneaking bites of the freshly rolled gingerbread dough from the table. We'd watch the cookies rise together through the oven door and it was all I could do not to press my face against the hot glass, getting closer and closer to the gingerbread goodness. If those cookies could talk, they would have gotten a restraining order against my six-year-old self.

Come birthday time, without fail, my mom would get me the coolest cake in town. From a 3-D Strawberry Shortcake buttercream extravaganza to an airbrushed Princess Leah to an edible basket full of handcrafted flowers, my cakes were always unbelievably creative and cool. And to be clear, they weren't the type of "break the bank cool" that you see nowadays, where parents spend hundreds of dollars on a three-tier birthday cake for their two-year-old. No, my birthday cakes were small in size, but huge in creativity and flawless in detail. As a result, to this day I'm obsessed with crazy, creative cakes. This is no more evident than in my husband's and my CandyLand-themed wedding cake. When we have kids, their cakes will be just as original as they are. It's tradition.

Let's go from birthday time to burger time. Every summer, my brother and I would spend a few weeks with our grandparents near the beach. We would spend hours and hours playing in the sand and splashing in the bay with our friends. Come lunchtime, we were famished and there was only place we would go: a tiny, hole-in-the-wall burger joint a few blocks away from their house. No shoes, no shirt, no problem; a not-so-small gang of us would run barefoot through the street, covered in sand and chomping at the theoretical bit. Perched on our tip-toes at the order window, we'd get burgers, fries, onion rings and whatever else we wanted, then oblige our parents' appetites by reading off their list of lunch-related demands (usually in the neighborhood of a tuna fish sandwich). We'd bring back our bounty and sit, feet dangling, on the patio chairs. After a 30-minute obligatory waiting (read: digestive) period, our parents would unleash the hounds – or in our case, their children – back to the beach for an afternoon of surf and sun. It was the best.

These memories are just a splash in my so-called culinary pan. There are hundreds, if not thousands, of food-related memories I cherish. I could go on for days about the time I taught myself the art of risotto at twelve years old. My parents did not appreciate the "wow, she really overdid the garlic" aroma that lingered for days. Sorry, Mom and Dad. Or the time I experimented making different types of pancakes as an after-school snack. In elementary school. Or, later in life, the time I cooked dinner for twenty-five of our friends during a weekend in Big Bear. While everyone else snowboarded and skied, my now-husband and I went grocery shopping, put on one of our favorite playlists and cooked a carbo-loaded, post-mountain feast for hours. While everyone else froze on the slope, we danced and sang and cooked by the warmth of the fire and the delicious smell of homemade lasagna.

Like I said, I could go on for hours. But I won't. The glory of finally, finally, FINALLY starting this blog is that I've got time and a place to share these stories, both old and new. So share I will. Favorite food memories. Scanned Polaroids of my childhood cakes. Random recipes that I've perfected over the years. Photos of delicious, creative and inspiring meals from some of my favorite watering holes and foodie haunts. I can't wait.

So, whoever is out there reading this, thank you. Now let's talk about food.